Following are the steps to be followed to install weblogic 10.3.
1) Download Weblogic 10.3 version from the following Link
http://download.oracle.com/otn/bea/weblogic/server103/net_server103_win32.exe
2) Step 2: Install ADF Runtime Libraries on Weblogic 10.3
a) To install ADF runtime libraries first Download JDeveloper 11.1.1.0 from the following Link
http://www.oracle.com/technology/software/products/jdev/htdocs/soft110.html
Note: Make sure u download the exact JDeveloper Version else the higher versions are not compatible with weblogic 10.3
Step 3: Configure the Weblogic Server Domain
a) Go to Start -> Select Oracle WebLogic -> WebLogic Server 10gR3 -> Tools -> Configuration Wizard
b)
 The Configuration Wizard should then appear with the Welcome page. Select Create a new WebLogic domain then next:
c) In the Select Domain Source page – select Generate a domain configured automatically to support the following products, and in addition select the Application Development Framework option

d) In the Configure Administrator Username and Password page – enter a user name and password for the default WebLogic Server administrator:

e) In the Configure Server Start Mode and JDK page - Select either the Production Mode or Development Mode option. In addition select the JDK for the Domain to use.
Note: JDK option should be same for WLS install as well as Configure Weblogic domain.


f) In Customize Environment and Services Settings page – Select Yes to customize the environment.
 g) In Configure RDBMS Security Store Database page – Click Next with the default option selected:
 h) In the Configure the Administration Server page – Leave the Server Name as AdminServer, Listen Address as your IP Address or you can go ahead with the default option. Listen Port leave the default 7001.
Note: Each WLS domain includes 1 administration server by default called as the AdminServer. The AdminServer is used to configure and maintain the other server instances under WLS. We should create a separate server to install and run our applications. It does not mean AdminServer is only for Administration, Its also possible to install and run our applications.
 i) In the Configure Managed Servers page – you can keep the default settings, but you'll need to change the port number to something different from the AdminServer, say 7002. Also change the name of the server to ManagedServer.
 j) In the Configure Clusters page – Dont enter anything and Click Next because we will not consider clusters here.
 k) Configure Machines page – Dont Create anything, Click Next
 l) Review WebLogic Domain page – Click Next
 m) In the Create WebLogic Domain page – enter the name of the domain and accept the default directory. I'll take the domain name adf_domain, then click Create:
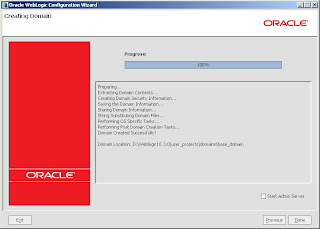
n) Make sure the domain created successfully as shown below: Check the Start Admin server and click done to finish the installation.

o) You will get a command prompt to check the status of the WLS. Once the Status shows as Server Started in Running Mode. Open Browser and enter the following URL
http://localhost:7001
You will see welcome Screen, Enter Username and Password


